Eureka启动流程-源码小段分析
本文参考自朱荣鑫老师的书《Spring Cloud微服务架构进阶》,强烈建议阅读本书。
Eureka是Netflix开源的服务治理组件,内部网络间的微服务调用已不再使用IP地址,而使用微服务名称,所以需要有Eureka这样的的组件存在,负责维护服务的状态。Spring Cloud整合了Eureka,使用Spring生态可以做到对其开箱即用。
除了Eureka,Spring Cloud还整合了其他Netflix组件,统称为Spring Cloud Netflix,Spring Cloud Netflix包含了服务治理Eureka、路由Zuul、客户端负载均衡Ribbon、熔断器Hystrix。
除了上面这些,开发中常用的还有声明式Http客户端Feign,也是Netflix公司开源的。Spring Cloud在Feign的基础上支持了Spring MVC的注解,叫OpenFeign。
言归正传,微服务离不开服务治理,本章探讨Eureka的使用和源码以及集群的实现原理。
总览

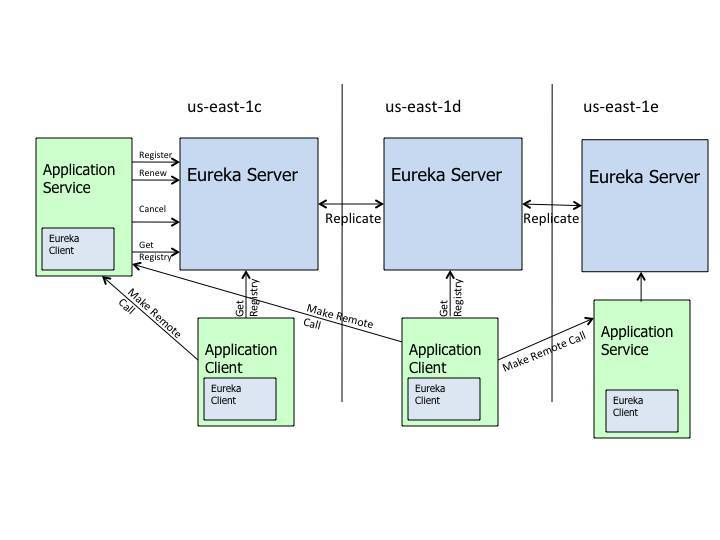
上图是Eureka官方的架构图。这里面有如下角色。
- Application Service:这是你的业务系统服务端(微服务)
- Eureka Client:这是Eureka客户端,可以理解为一个jar包,嵌入在你的业务系统Application Service中,用于向Eureka服务端注册信息等
- Application Client:这是你的业务系统客户端,嵌入了Eureka Client用于向Eureka服务端获取你要调用的Application Service信息,然后Application Client发起向Application Service的调用
- Eureka Server:Eureka服务器,管理所有的微服务状态
- us-east-1c:Eureka最初设计的目的是用于亚马逊云服务AWS的分布式系统的,所以引入了AWS的Region(区域)和Zone(Availability Zone可用区)的概念,一个Region包含多个Zone。上图中us-east-1c, us-east-1d, us-east-1e都属于Zone,这三个Zone属于us-east-1这个Region
Eureka Client提供了以下几个功能:
- 向Eureka Server注册自己
- 定时向Eureka Server续约
- 客户端下线
- 获取注册表
对应的,Eureka Server提供以下功能:
- 提供服务注册
- 接收服务心跳
- 服务下线
- 获取注册表中服务实例信息
- 服务剔除
- 集群同步
准备工作
为了方便跟踪问题,可以把netflix包的DEBUG日志打开。
logging:
  level:
    com.netflix: DEBUG
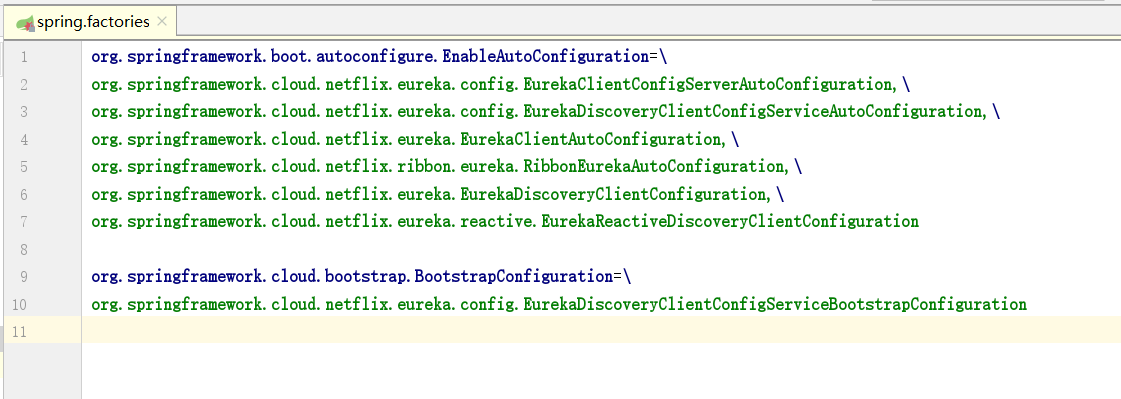
同时,我们应该知道,Spring Boot的自动化配置原理是加载了类路径下的META-INF/spring.factories文件,如下图,eureka-client包中加载的自动化配置类如下:

分析步骤
通过Eureka DEBUG级别的日志打印,我们可以看到第一条有关Eureka的日志为:
2019-11-24 10:48:11.235  INFO 115648 --- [           main] com.netflix.discovery.DiscoveryClient    : Initializing Eureka in region us-east-1
2019-11-24 10:48:13.030  INFO 115648 --- [           main] c.n.d.provider.DiscoveryJerseyProvider   : Using JSON encoding codec LegacyJacksonJson
2019-11-24 10:48:13.030  INFO 115648 --- [           main] c.n.d.provider.DiscoveryJerseyProvider   : Using JSON decoding codec LegacyJacksonJson
2019-11-24 10:48:13.232  INFO 115648 --- [           main] c.n.d.provider.DiscoveryJerseyProvider   : Using XML encoding codec XStreamXml
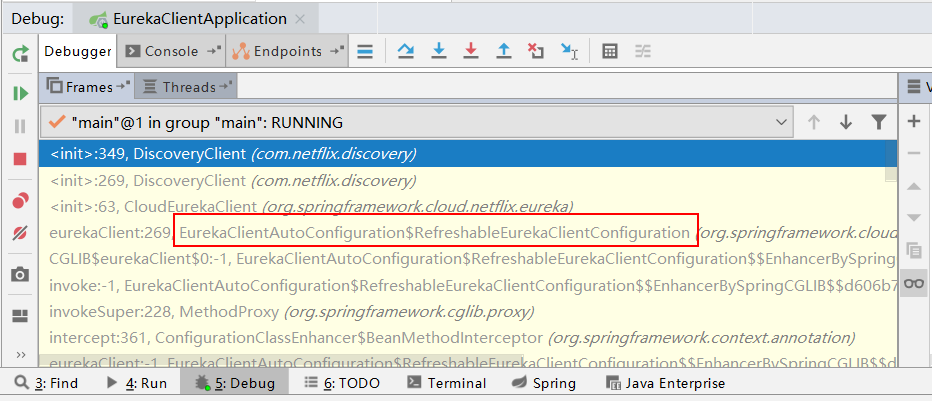
以上为类com.netflix.discovery.DisconveryClient打印的日志,在此处打一个断点,debug模式重新启动应用。在IDEA或Eclipse中查看调用栈,如下图:

从上图可以看出,该方法入口刚好吻合我们上面的分析,是Eureka的自动配置类EurekaClientAutoConfiguration触发的。其源码如下:
// 打印日志
logger.info("Initializing Eureka in region {}", this.clientConfig.getRegion());
// 配置文件中的register-with-eureka和fetch-registry如果都为false则不注册和拉去服务列表了
if (!config.shouldRegisterWithEureka() && !config.shouldFetchRegistry()) {
	logger.info("Client configured to neither register nor query for data.");
	this.scheduler = null;
	this.heartbeatExecutor = null;
	this.cacheRefreshExecutor = null;
	this.eurekaTransport = null;
	this.instanceRegionChecker = new InstanceRegionChecker(new PropertyBasedAzToRegionMapper(config), this.clientConfig.getRegion());
	DiscoveryManager.getInstance().setDiscoveryClient(this);
	DiscoveryManager.getInstance().setEurekaClientConfig(config);
	this.initTimestampMs = System.currentTimeMillis();
	logger.info("Discovery Client initialized at timestamp {} with initial instances count: {}", this.initTimestampMs, this.getApplications().size());
} else {
同理,其他源码的分析也可以通过DEBUG日志和断点来分析。以下不再赘述。
Eureka Client源码解析
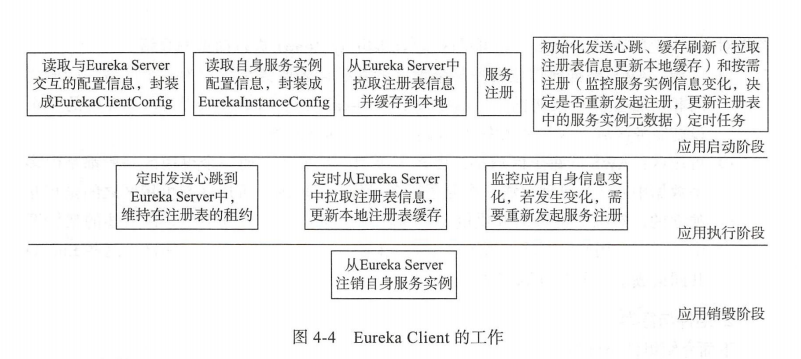
Eureka为了做到开箱即用,简化开发人员的开发工作,将很多与Eureka Server交互的工作隐藏起来,自主完成。在应用的不同阶段执行不同工作,如下图。

从上面代码
logger.info("Initializing Eureka in region {}", this.clientConfig.getRegion());
打断点逐步跟踪,可以发现Eureka Client的执行步骤如下:
1. 向Eureka服务器拉取全量注册信息
代码位于DiscoveryClient#fetchRegistry方法中。
private boolean fetchRegistry(boolean forceFullRegistryFetch) {
	Stopwatch tracer = this.FETCH_REGISTRY_TIMER.start();

	label122: {
		boolean var4;
		try {
            Applications applications = this.getApplications();
            // 如果增量式拉取被禁止,或者Applications为null,进行全量拉取
			if (!this.clientConfig.shouldDisableDelta() && Strings.isNullOrEmpty(this.clientConfig.getRegistryRefreshSingleVipAddress()) && !forceFullRegistryFetch && applications != null && applications.getRegisteredApplications().size() != 0 && applications.getVersion() != -1L) {
				this.getAndUpdateDelta(applications);
			} else {
				logger.info("Disable delta property : {}", this.clientConfig.shouldDisableDelta());
				logger.info("Single vip registry refresh property : {}", this.clientConfig.getRegistryRefreshSingleVipAddress());
				logger.info("Force full registry fetch : {}", forceFullRegistryFetch);
				logger.info("Application is null : {}", applications == null);
				logger.info("Registered Applications size is zero : {}", applications.getRegisteredApplications().size() == 0);
                logger.info("Application version is -1: {}", applications.getVersion() == -1L);
                // 全量拉取注册表信息
				this.getAndStoreFullRegistry();
			}

			applications.setAppsHashCode(applications.getReconcileHashCode());
			this.logTotalInstances();
			break label122;
		} catch (Throwable var8) {
			logger.error("DiscoveryClient_{} - was unable to refresh its cache! status = {}", new Object[]{this.appPathIdentifier, var8.getMessage(), var8});
			var4 = false;
		} finally {
			if (tracer != null) {
				tracer.stop();
			}

		}

		return var4;
	}

	this.onCacheRefreshed();
	this.updateInstanceRemoteStatus();
	return true;
}
拉取注册表地址的代码为:
// 这里的urlPath传入的是/apps
WebResource webResource = this.jerseyClient.resource(this.serviceUrl).path(urlPath);
以上的this.serviceUrl默认为http://localhost:8761/eureka所以注册表地址是http://localhost:8761/eureka//apps
为了避免本文篇幅太长,建议想了解这部分的原理请看朱荣鑫老师的书《Spring Cloud微服务架构进阶》
这里总结下Eureka Client启动的整个过程:
- 拉取注册表信息:Eureka启动后,会全量拉取服务端的注册表信息,保存到本地缓存,以后增量拉取注册表信息。默认地址为:
http://localhost:8761/eureka/apps - 服务注册:拉取完注册表信息后,注册自身服务元数据,默认地址为:
http://localhost:8761/eureka/apps/{app-name} - 初始化定时任务:初始化了三个定时器任务,一个拉取注册表刷新缓存,一个发送心跳,一个当应用元数据发生变化时按需注册。心跳默认30s一次,地址为:
http://localhost:8761/eureka/apps/{app-name}/{instance-info-id},参数主要有 status (当前服务的状态)等,状态信息默认使用Spring Boot Actuator获取。 - 服务下线:地址为:
http://localhost:8761/eureka/apps/{app-name}/{instance-info-id},http方法为delete。
Eureka Server源码解析
Eureka Server作为一个开箱即用的服务注册中心,需要注意的是,Eureka Server同时也是一个Eureka Client,它会向它配置文件中的其他Eureka Server进行拉取注册表、服务注册和发送心跳等操作。
还是按照上面源码的分析步骤,将com.netflix包调为DEBUG级别,可以在日志中看到如下:
2019-11-25 11:14:23.816  INFO 237032 --- [           main] c.n.e.registry.AbstractInstanceRegistry  : Finished initializing remote region registries. All known remote regions: []
2019-11-25 11:14:23.817  INFO 237032 --- [           main] c.n.eureka.DefaultEurekaServerContext    : Initialized
2019-11-25 11:14:23.846  INFO 237032 --- [           main] o.s.b.a.e.web.EndpointLinksResolver      : Exposing 2 endpoint(s) beneath base path '/actuator'
2019-11-25 11:14:23.866  INFO 237032 --- [           main] s.b.a.e.w.s.WebMvcEndpointHandlerMapping : Mapped "{[/actuator/health],methods=[GET],produces=[application/vnd.spring-boot.actuator.v2+json || application/json]}" onto public java.lang.Object org.springframework.boot.actuate.endpoint.web.servlet.AbstractWebMvcEndpointHandlerMapping$OperationHandler.handle(javax.servlet.http.HttpServletRequest,java.util.Map<java.lang.String, java.lang.String>)
查看方法AbstractInstanceRegistry#register,该方法是提供服务注册功能的基础。源码如下:
public void register(InstanceInfo registrant, int leaseDuration, boolean isReplication) {
	try {
        read.lock();
        // 根据appName对服务实例集群进行分类
		Map<String, Lease<InstanceInfo>> gMap = registry.get(registrant.getAppName());
		REGISTER.increment(isReplication);
		if (gMap == null) {
			final ConcurrentHashMap<String, Lease<InstanceInfo>> gNewMap = new ConcurrentHashMap<String, Lease<InstanceInfo>>();
			gMap = registry.putIfAbsent(registrant.getAppName(), gNewMap);
			if (gMap == null) {
				gMap = gNewMap;
			}
        }
        // 根据实例id获取实例的租约
		Lease<InstanceInfo> existingLease = gMap.get(registrant.getId());
		// Retain the last dirty timestamp without overwriting it, if there is already a lease
		if (existingLease != null && (existingLease.getHolder() != null)) {
			Long existingLastDirtyTimestamp = existingLease.getHolder().getLastDirtyTimestamp();
			Long registrationLastDirtyTimestamp = registrant.getLastDirtyTimestamp();
			logger.debug("Existing lease found (existing={}, provided={}", existingLastDirtyTimestamp, registrationLastDirtyTimestamp);

			// this is a > instead of a >= because if the timestamps are equal, we still take the remote transmitted
			// InstanceInfo instead of the server local copy.
			if (existingLastDirtyTimestamp > registrationLastDirtyTimestamp) {
				logger.warn("There is an existing lease and the existing lease's dirty timestamp {} is greater" +
						" than the one that is being registered {}", existingLastDirtyTimestamp, registrationLastDirtyTimestamp);
				logger.warn("Using the existing instanceInfo instead of the new instanceInfo as the registrant");
				registrant = existingLease.getHolder();
			}
		} else {
            // The lease does not exist and hence it is a new registration
            // 如果租约不存在,这是一个新的注册实例
			synchronized (lock) {
				if (this.expectedNumberOfRenewsPerMin > 0) {
					// Since the client wants to cancel it, reduce the threshold
					// (1
                    // for 30 seconds, 2 for a minute)
                    // 自我保护机制
					this.expectedNumberOfRenewsPerMin = this.expectedNumberOfRenewsPerMin + 2;
					this.numberOfRenewsPerMinThreshold =
							(int) (this.expectedNumberOfRenewsPerMin * serverConfig.getRenewalPercentThreshold());
				}
			}
			logger.debug("No previous lease information found; it is new registration");
        }
        // 创建新的租约
		Lease<InstanceInfo> lease = new Lease<InstanceInfo>(registrant, leaseDuration);
		if (existingLease != null) {
			lease.setServiceUpTimestamp(existingLease.getServiceUpTimestamp());
		}
		gMap.put(registrant.getId(), lease);
		synchronized (recentRegisteredQueue) {
			recentRegisteredQueue.add(new Pair<Long, String>(
					System.currentTimeMillis(),
					registrant.getAppName() + "(" + registrant.getId() + ")"));
		}
		// This is where the initial state transfer of overridden status happens
		if (!InstanceStatus.UNKNOWN.equals(registrant.getOverriddenStatus())) {
			logger.debug("Found overridden status {} for instance {}. Checking to see if needs to be add to the "
							+ "overrides", registrant.getOverriddenStatus(), registrant.getId());
			if (!overriddenInstanceStatusMap.containsKey(registrant.getId())) {
				logger.info("Not found overridden id {} and hence adding it", registrant.getId());
				overriddenInstanceStatusMap.put(registrant.getId(), registrant.getOverriddenStatus());
			}
		}
		InstanceStatus overriddenStatusFromMap = overriddenInstanceStatusMap.get(registrant.getId());
		if (overriddenStatusFromMap != null) {
			logger.info("Storing overridden status {} from map", overriddenStatusFromMap);
			registrant.setOverriddenStatus(overriddenStatusFromMap);
		}

		// Set the status based on the overridden status rules
		InstanceStatus overriddenInstanceStatus = getOverriddenInstanceStatus(registrant, existingLease, isReplication);
		registrant.setStatusWithoutDirty(overriddenInstanceStatus);

		// If the lease is registered with UP status, set lease service up timestamp
		if (InstanceStatus.UP.equals(registrant.getStatus())) {
			lease.serviceUp();
		}
		registrant.setActionType(ActionType.ADDED);
		recentlyChangedQueue.add(new RecentlyChangedItem(lease));
		registrant.setLastUpdatedTimestamp();
		invalidateCache(registrant.getAppName(), registrant.getVIPAddress(), registrant.getSecureVipAddress());
		logger.info("Registered instance {}/{} with status {} (replication={})",
				registrant.getAppName(), registrant.getId(), registrant.getStatus(), isReplication);
	} finally {
		read.unlock();
	}
}
为了避免本文篇幅太长,建议想了解这部分的原理请看朱荣鑫老师的书《Spring Cloud微服务架构进阶》
这里总结下Eureka Server启动的整个过程:
- 提供服务注册
- 接收服务心跳
- 服务剔除
- 服务下线
- 集群同步:Eureka Server启动时,从它的peer节点拉取注册表,每个Eureka Server对本地注册表进行操作时,它将遍历Eureka Server的peer节点,发送同步请求。
- 提供获取注册表信息。
以上,本文结束。


