轻松理解Shiro与实战
后端管理系统登录一般都涉及到权限控制,权限管理组件用的最多的就是Apache的Shiro了,任何系统的登录模块,基本都可以使用shiro来实现我们的功能。相信看到这篇文章的肯定知道了Shiro的作用,废话不多说,直入主题吧。
Spring Boot整合Shiro
首先来思考一下正常需要权限控制的网站它的登录流程是什么样的?大概流程如下。
- 设置页面拦截。系统中有些页面可以直接访问,有些页面需要登录才能访问,有些页面不仅需要登录还需要登录的用户有相关权限才能访问,这是第一步。
- 如果用户没登录直接访问需要登录或需要权限的页面,则调转到登录页面让用户登录
- 用户登录认证后,访问需要权限的页面时,系统可以识别该用户是谁并鉴权。
Shiro说到底就是按上面步骤解决问题的,我们要做的仅仅是:配置拦截页和权限接口、实现认证业务逻辑、实现鉴权业务逻辑。
表设计
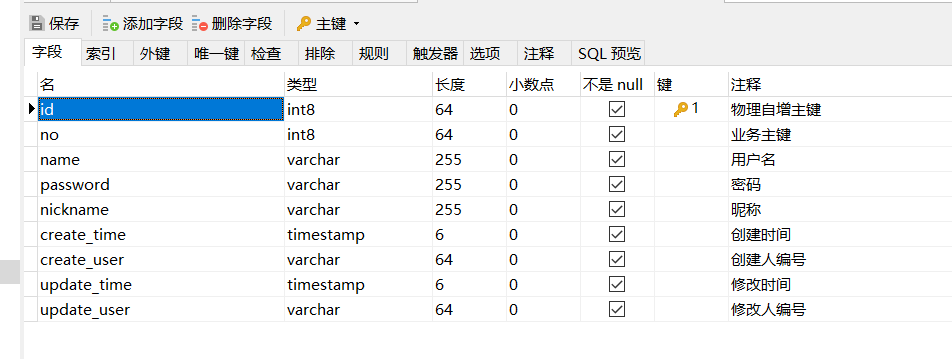
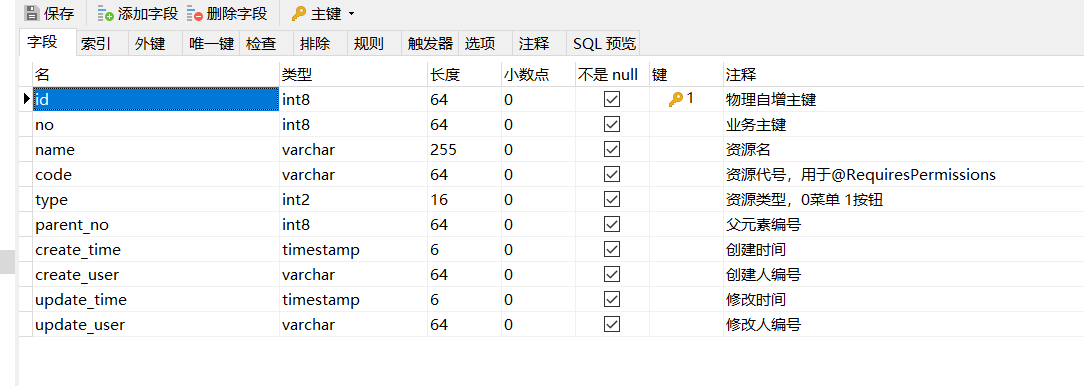
用户权限模块一般涉及到五张表,基本的三张表 + 两张关联表:(用户表base_user, 角色表base_role, 资源表base_resource) + (用户角色关联表base_user_role, 角色资源关联表base_role_resource),以下说说表结构。
用户表base_user
主要是用户名和密码两个字段,用来登录认证。

角色表
系统中所有的角色

资源表
系统中所有的资源包括菜单和按钮等,都需要权限控制。其中code代表了资源代号,其实也可以用表中的no代替用于控制权限,不过用自定义的code比较直观,比如添加文章按钮的权限可以设置为article:add

用户角色表
每个用户对应多个角色,一个角色可以对应多个用户,权限资源是赋予角色的。

角色资源表
多对多的关系。

脚本整理
以上五个表的脚本(postgresql)
-- 用户表
create table base_user (
	id bigserial,
	no int8 not null default 0,
	name varchar(255) not null default '',
	password varchar(255) not null default '',
	nickname varchar(255) not null default '',
	create_time timestamp not null default current_timestamp,
	create_user varchar(64) not null default '',
	update_time timestamp not null default current_timestamp,
	update_user varchar(64) not null default current_timestamp,
	constraint "base_user_primary_key" primary key (id)
);
comment on table base_user is '用户表';
comment on column base_user.id is '物理自增主键';
comment on column base_user.no is '业务主键';
comment on column base_user.name is '用户名';
comment on column base_user.password is '密码';
comment on column base_user.nickname is '昵称';
comment on column base_user.create_time is '创建时间';
comment on column base_user.create_user is '创建人编号';
comment on column base_user.update_time is '修改时间';
comment on column base_user.update_user is '修改人编号';
-- 角色表
create table base_role (
	id bigserial,
	no int8 not null default 0,
	name varchar(255) not null default '',
	create_time timestamp not null default current_timestamp,
	create_user varchar(64) not null default '',
	update_time timestamp not null default current_timestamp,
	update_user varchar(64) not null default current_timestamp,
	constraint "base_role_primary_key" primary key (id)
);
comment on table base_role is '角色表';
comment on column base_role.id is '物理自增主键';
comment on column base_role.no is '业务主键';
comment on column base_role.name is '角色名';
comment on column base_role.create_time is '创建时间';
comment on column base_role.create_user is '创建人编号';
comment on column base_role.update_time is '修改时间';
comment on column base_role.update_user is '修改人编号';
-- 资源表
create table base_resource (
	id bigserial,
	no int8 not null default 0,
	name varchar(255) not null default '',
	code varchar(64) not null default '',
	type int2 not null default 0,
	parent_no int8 not null default 0,
	create_time timestamp not null default current_timestamp,
	create_user varchar(64) not null default '',
	update_time timestamp not null default current_timestamp,
	update_user varchar(64) not null default current_timestamp,
	constraint "base_resource_primary_key" primary key (id)
);
comment on table base_resource is '资源表';
comment on column base_resource.id is '物理自增主键';
comment on column base_resource.no is '业务主键';
comment on column base_resource.name is '资源名';
comment on column base_resource.code is '资源代号,用于@RequiresPermissions';
comment on column base_resource.type is '资源类型,0菜单 1按钮';
comment on column base_resource.parent_no is '父元素编号';
comment on column base_resource.create_time is '创建时间';
comment on column base_resource.create_user is '创建人编号';
comment on column base_resource.update_time is '修改时间';
comment on column base_resource.update_user is '修改人编号';
-- 角色权限表
create table base_user_role (
	id bigserial,
	no int8 not null default 0,
	user_no int8 not null default 0,
	role_no int8 not null default 0,
	create_time timestamp not null default current_timestamp,
	create_user varchar(64) not null default '',
	update_time timestamp not null default current_timestamp,
	update_user varchar(64) not null default current_timestamp,
	constraint "base_user_role_primary_key" primary key (id)
);
comment on table base_user_role is '用户角色表';
comment on column base_user_role.id is '物理自增主键';
comment on column base_user_role.no is '业务主键';
comment on column base_user_role.user_no is '用户编号';
comment on column base_user_role.role_no is '角色编号';
comment on column base_user_role.create_time is '创建时间';
comment on column base_user_role.create_user is '创建人编号';
comment on column base_user_role.update_time is '修改时间';
comment on column base_user_role.update_user is '修改人编号';
-- 角色资源表
create table base_role_resource (
	id bigserial,
	no int8 not null default 0,
	role_no int8 not null default 0,
	resource_no int8 not null default 0,
	create_time timestamp not null default current_timestamp,
	create_user varchar(64) not null default '',
	update_time timestamp not null default current_timestamp,
	update_user varchar(64) not null default current_timestamp,
	constraint "base_role_resource_primary_key" primary key (id)
);
comment on table base_role_resource is '用户角色表';
comment on column base_role_resource.id is '物理自增主键';
comment on column base_role_resource.no is '业务主键';
comment on column base_role_resource.role_no is '角色编号';
comment on column base_role_resource.resource_no is '资源编号';
comment on column base_role_resource.create_time is '创建时间';
comment on column base_role_resource.create_user is '创建人编号';
comment on column base_role_resource.update_time is '修改时间';
comment on column base_role_resource.update_user is '修改人编号';
导入shiro-spring-boot-web-starter
maven中导入如下Shiro的坐标。
<dependency>
    <groupId>org.apache.shiro</groupId>
    <artifactId>shiro-spring-boot-web-starter</artifactId>
    <version>1.5.1</version>
</dependency>
拦截所有页面
步骤都在下面代码的注释了,总结一句话就是:通过ShiroFilterFactoryBean配置拦截的页面,拦截后调转到登录页,登录过程中,SecurityManager调用Realm来获取认证、授权的信息。
package io.github.zebinh.zmall.mall.admin.config;

import org.apache.shiro.authc.*;
import org.apache.shiro.authz.AuthorizationInfo;
import org.apache.shiro.authz.SimpleAuthorizationInfo;
import org.apache.shiro.realm.AuthorizingRealm;
import org.apache.shiro.spring.web.ShiroFilterFactoryBean;
import org.apache.shiro.subject.PrincipalCollection;
import org.apache.shiro.web.mgt.DefaultWebSecurityManager;
import org.springframework.beans.factory.annotation.Autowired;
import org.springframework.context.annotation.Bean;
import org.springframework.context.annotation.Configuration;

import java.util.LinkedHashMap;
import java.util.Map;

/**
 * Shiro配置类
 */
@Configuration
public class ShiroConfig {


    /**
     *  Shiro自带的过滤器,可以在这里配置拦截页面
     */
    @Bean
    public ShiroFilterFactoryBean shiroFilterFactoryBean(@Autowired DefaultWebSecurityManager securityManager){

        // 1. 初始化一个ShiroFilter工程类
        ShiroFilterFactoryBean shiroFilterFactoryBean = new ShiroFilterFactoryBean();

        // 2. 我们知道Shiro是通过SecurityManager来管理整个认证和授权流程的,这个SecurityManager可以在下面初始化
        shiroFilterFactoryBean.setSecurityManager(securityManager);

        // 3. 上面我们讲过,有的页面不需登录任何人可以直接访问,有的需要登录才能访问,有的不仅要登录还需要相关权限才能访问
        Map<String, String> filterMap = new LinkedHashMap<>();

        // 4. Shiro过滤器常用的有如下几种
        // 4.1. anon 任何人都能访问,如登录页面
        filterMap.put("/api/user/login", "anon");
        // 4.2. authc 需要登录才能访问,如系统内的全体通知页面
        filterMap.put("/api/user/notics", "authc");
        // 4.3. roles需要相应的角色才能访问,当然可以改为在需要权限的接口上加注解@RequiresRoles(value = {"admin","manager","writer"}, logical = Logical.OR)或者@RequiresPermissions("article:add")
        // filterMap.put("/api/user/getUser", "roles[admin]");
        // 5. 让ShiroFilter按这个规则拦截
        shiroFilterFactoryBean.setFilterChainDefinitionMap(filterMap);

        // 6. 用户没登录被拦截后,当然需要调转到登录页了,这里配置登录页
        shiroFilterFactoryBean.setLoginUrl("/api/user/login");
        return shiroFilterFactoryBean;
    }

    /**
     * SecurityManager管理认证、授权整个流程
     */
    @Bean
    public DefaultWebSecurityManager defaultWebSecurityManager(@Autowired UserRealm userRealm){

        // 7. 新建一个SecurityManager供ShiroFilterFactoryBean使用
        DefaultWebSecurityManager securityManager = new DefaultWebSecurityManager();
        // 8. SecurityManager既然管理认证等信息,那他就需要一个类来帮他查数据库吧。这就是Realm类
        securityManager.setRealm(userRealm);
        return securityManager;
    }

    /**
     * 自定义Realm,当SecurityBean需要来查询相关权限信息时,需要有Realm代劳
     */
    @Bean
    public UserRealm userRealm(){
        return new UserRealm();
    }


    /**
     * 为了方便观看,我将UserRealm类的实现写在这里了
     */
    class UserRealm extends AuthorizingRealm {

        // 9. 前面被authc拦截后,需要认证,SecurityBean会调用这里进行认证
        @Override
        protected AuthenticationInfo doGetAuthenticationInfo(AuthenticationToken authenticationToken) throws AuthenticationException {
            System.out.println("执行认证逻辑");
            UsernamePasswordToken token = (UsernamePasswordToken)authenticationToken;

            // 9.1. 为了方便演示,我这里写死了用户admin-name密码admin-pwd才能登录
            if (token.getUsername() == null || !token.getUsername().equals("admin-name")){
                return null;
            }

            return new SimpleAuthenticationInfo("", "admin-pwd", "");
        }

        // 10. 前面被roles拦截后,需要授权才能登录,SecurityManager需要调用这里进行权限查询
        @Override
        protected AuthorizationInfo doGetAuthorizationInfo(PrincipalCollection principalCollection) {
            System.out.println("执行授权逻辑");

            // 10.1. 为了方便演示,这里直接写死返回了admin角色,所有能登录的角色都是admin了
            SimpleAuthorizationInfo info = new SimpleAuthorizationInfo();
            info.addRole("admin");
            return info;
        }
    }

}
调转到登录页后,用户登录,直接调用Subject类的login方法即可,Subject类会调用SecurityManager进行认证。看到这里,应该就能理解本文开头的两幅图了吧。
package io.github.zebinh.zmall.mall.admin.user.controller;

import org.apache.shiro.SecurityUtils;
import org.apache.shiro.authc.AuthenticationException;
import org.apache.shiro.authc.UnknownAccountException;
import org.apache.shiro.authc.UsernamePasswordToken;
import org.apache.shiro.subject.Subject;
import org.springframework.web.bind.annotation.*;

import java.util.Map;

@RestController
@RequestMapping("api/user")
public class UserController {

    @PostMapping("login")
    public String login(@RequestBody Map<String, String> user){

        Subject subject = SecurityUtils.getSubject();
        UsernamePasswordToken token = new UsernamePasswordToken(user.get("username"), user.get("password"));

        try{
            subject.login(token);
        }catch (UnknownAccountException e){
            System.out.println("用户名不存在");
            return "用户名不存在";
        }catch (AuthenticationException e) {
            System.out.println("认证失败");
            return "认证失败";
        }
        return "登录成功";
    }

    @GetMapping("getUser")
    public Object getUser() {
        return SecurityUtils.getSubject();
    }

    @RequiresPermissions("article:add")
    @GetMapping("notics")
    public String notics(){
        return "通知";
    }
}
前后端分离按钮显示
前后端分离时,后端可以提供一个查询用户权限的接口,前端如果是vue,可以使用v-if判断该用户使用有权限再显示,如:v-if=”hasPermission(‘acticle:add’)”
Shiro如何识别用户
在登录完成后,shiro会发一个cookie给客户端,包含了sessionId,因此能识别当前用户,当访问需要登录的页面时,如发现cookie中有sessionId,判断该用户已登录,则不需要调用Realm再进行认证了。cookie如下所示。

那么问题来了,cookie只有pc端才有,移动端并没有cookie,该怎么解决移动端的shiro认证问题呢,同时这种方式无法解决单点登录的问题,应为cookie只能在同源的网站被发送到服务器。
解决方案就是,这时候就要定义自己的Session管理器了。用户登录后,自定义Session管理器生成session并生成一个token给到前端,前端每次访问都传递token,shiro会调用自定义的Session管理器做校验。Session中可以放置当前登录用户的信息并放置在redis中。自定义的Session管理器每次从redis中读取数据即可。
推荐阅读
推荐一个这个开源项目,可以理解Shiro权限的设计理念:https://github.com/Heeexy/SpringBoot-Shiro-Vue


